How to use Universal Robot MCP, a step by step tutorial
Introduction
The Model Context Protocol (MCP) represents a breakthrough in AI-system integration, enabling AI assistants to interact with external tools and services through a standardized interface. When applied to industrial robotics, MCP transforms how we control Universal Robots, allowing natural language commands to control sophisticated robotic systems safely and efficiently.
This tutorial will guide you through setting up and using the Universal Robot MCP server, enabling AI assistants like Claude, ChatGPT, and other MCP-compatible clients to control UR robots through simple conversational commands. You’ll learn installation, configuration, basic operations, and advanced safety features.
Requirements:
- Computer with Python 3.8+ (Windows, macOS, or Linux)
- MCP-compatible client (LM Studio, VS Code + Cline, Cursor, or Zed)
- Universal Robot (UR3/UR5/UR10/UR16/UR20/UR30) or simulation environment
- Network connection between computer and robot
- Basic understanding of robot safety procedures
Note: The Universal Robot MCP server is currently under active development and testing. Please exercise caution when using it with production systems.
Github Repository
PyPI Package
Model Context Protocol
Model Context Protocol (MCP) is an open standard developed by Anthropic for connecting AI assistants to external data sources and tools. Instead of creating custom integrations for each system, MCP provides a universal protocol that enables AI models to securely access content repositories, business tools, and development environments.
Think of MCP as a standardized bridge that allows AI assistants to break free from information silos and access real-world data. For robotics applications, this means AI can directly control physical systems like Universal Robots while maintaining context across different tools and datasets.
Introducing the Model Context Protocol
Universal Robot MCP
The Universal Robot MCP server is a specialized implementation that bridges AI assistants with Universal Robots industrial arms. This server provides secure, real-time control capabilities while maintaining the safety standards required for industrial automation.
Key Features:
- Robot Connection Management: Establish and maintain stable connections to UR robots
- Real-time Status Monitoring: Track joint positions, poses, and system health
- Motion Control: Execute both joint-based and linear movements with precision
- Safety Integration: Built-in collision detection and movement validation
- Simulation Mode: Test robot programs without physical hardware
Available MCP Tools:
connect_robot- Establish connection to Universal Robotdisconnect_robot- Safely disconnect from robotget_robot_status- Retrieve current robot state and positionmove_robot_joints- Control individual joint anglesmove_robot_linear- Execute Cartesian coordinate movements
The server supports all Universal Robot models (UR3, UR5, UR10, UR16, UR20, UR30) and maintains compatibility with UR software versions 3.0 and above.
Step 1: Install MCP Client
You need an MCP-compatible client to communicate with the Universal Robot MCP server. Several options are available (in no particular order):
LM Studio
Free local AI application with native MCP support (v0.3.17+).
- Download from lmstudio.ai
- Install and launch the application
- MCP support is built-in
VS Code
Microsoft’s development environment with MCP support.
- Install Visual Studio Code
- Configure MCP servers through settings
- Use with GitHub Copilot or other AI extensions
Cline
AI coding assistant extension with MCP integration.
- Download from cline.bot
- Install as VS Code extension or use standalone
- Configure MCP servers through extension settings
Cursor
AI code editor with MCP support.
- Download from cursor.com
- Create account (free tier available)
- Configure MCP in Settings > Features > MCP
OpenCode
Terminal-based AI coding assistant with MCP integration.
- Download from opencode.ai
- Supports multiple AI models (OpenAI, Claude, Gemini)
- Configure MCP servers through config file
Zed
Open-source editor with basic MCP support.
- Download from zed.dev
- Currently supports prompt templates
- Full tool support in development
Claude Desktop
Official desktop app from Anthropic with native MCP support.
- Download from claude.ai/desktop
- Requires Claude Pro subscription for MCP features
- Configure MCP servers through app settings
Choose the client that fits your workflow and proceed to the next step.
Step 2: (Optional) Install uv
Depending on your configuration method choice, you may need to install additional tools:
If you want to use uvx (isolated execution):
1 | # On macOS and Linux |
1 | # With Homebrew (macOS only) |
1 | # With pip |
If you want to use pip method:
Ensure you have Python 3.8+ installed with pip. No additional installation needed.
Update uv (if installed via standalone installer):
1 | uv self update |
uvx is included with uv and provides isolated Python package execution.
Get Homebrew | uv official repository
Step 3: Configure UR MCP
Now configure the Universal Robot MCP server in your chosen MCP client:
- Open LM Studio and go to the Program tab
- Click Install > Edit mcp.json to open the configuration file
- Add the Universal Robot MCP server configuration:
1 | { |
- Create a
.vscode/mcp.jsonfile in your workspace, or - Run “MCP: Open User Configuration” for global setup
- Add the server configuration:
1 | { |
- Click the MCP Servers icon in Cline
- Click “Configure MCP Servers”
- Add the server configuration:
1 | { |
- Go to Settings > Features > MCP
- Click “Add Custom MCP” or edit the mcp.json file
- Add the configuration:
1 | { |
- Edit your OpenCode config file
- Add under the
mcpsection:
1 | { |
- Open Claude Desktop settings
- Navigate to MCP configuration
- Add the server:
1 | { |
Configuration Options:
You can choose between two methods:
- uvx method (uses the configurations shown above)
- pip method - Replace the command with:
1 | "command": "python", |
Note: pip method requires pre-installing with pip install universal-robot-mcp.
Optional Configuration:
To specify a custom robot IP address, add an env section to your configuration:
1 | { |
Replace 192.168.1.100 with your robot’s actual IP address. If not specified, the server will use the default IP 192.168.1.100.
Next Steps:
- Save the configuration file
- Restart your MCP client
- The Universal Robot MCP server will be available as a tool
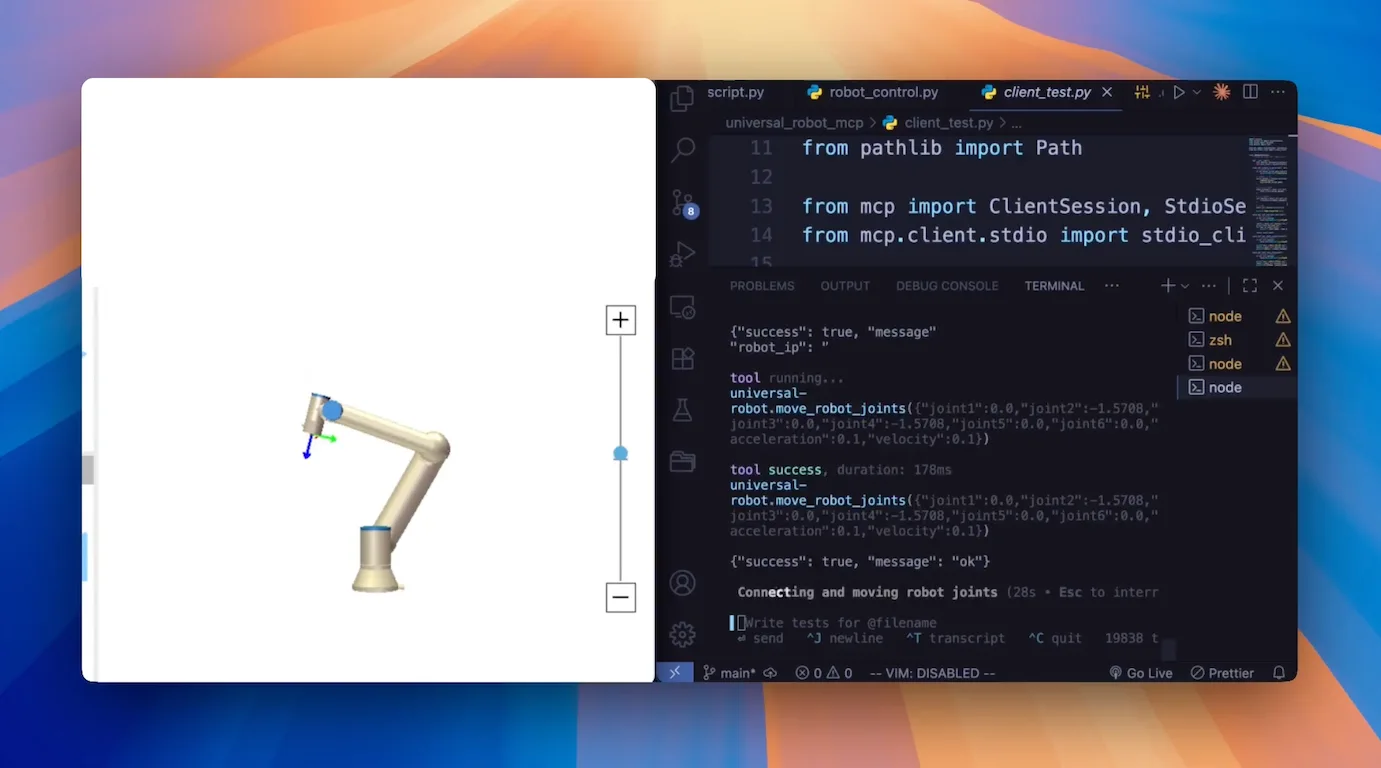
Step 4: Basic Usage
Once configured, you can start controlling your Universal Robot through natural language commands:
Connect to Your Robot:
1 | "Connect to the robot at IP address 192.168.1.100" |
Basic Commands:
1 | "What is the current status of the robot?" |
Connecting to Different Systems:
- Real Robot: Use the robot’s actual IP address
- URSim Simulator: Use
127.0.0.1or localhost - Polyscope: Check robot’s IP in Installation > General
Example:
1 | You: "Connect to the Universal Robot" |
Using with Other MCP Servers:
The Universal Robot MCP server can be used alongside other MCP servers in the same client. For example, you can combine it with file system tools, web scrapers, or database connectors to create powerful automation workflows:
1 | "Take a photo with the camera MCP server, then move the robot to inspect the part" |
Conclusion
You’ve successfully learned how to set up and use the Universal Robot MCP server to control UR robots through AI assistants. This integration enables natural language control of industrial robots while maintaining safety standards and precision.
Key Benefits:
- Natural language robot control through AI assistants
- Multi-client support across different development environments
- Built-in safety features for industrial applications
- Seamless integration with other MCP servers
Next Steps:
- Explore advanced robot programming through conversational AI
- Combine with vision systems and sensors through additional MCP servers
- Develop custom automation workflows using natural language commands
Resources:
- Universal Robot MCP GitHub Repository
- Universal Robot MCP PyPI Package
- Model Context Protocol Documentation
- Python URX Library
- Article Banner
The Universal Robot MCP server represents the future of human-robot interaction, where complex industrial automation becomes accessible through simple conversation. Start experimenting with your UR robot today and discover new possibilities in AI-driven automation.