Navigating the Fine-Tuning Landscape – Transmuting Language Models with FFT, SFT, and Qlora on Colab
Language
English
🥳 Introduction
Welcome! In this article, we will delve into several popular fine-tuning strategies: FFT (Full-Fine-Tuning), SFT (Supervised Fine Tune), and Qlora. Each strategy has its own uniqueness and is applicable to different scenarios and needs. Let’s explore these strategies together, understand how they work, and how to choose and use them in practical applications. Let’s get started!
Since Llama1 was introduced, the open-source model community has begun to flourish. From Alpaca, Vicuna, WizardLM to Baichuan, Qianwen, and ChatGLM, open-source has largely been able to bring more ideas to individuals and enterprises, adding to diversity. With the release of Llama2, even better performance (relatively speaking) and more relaxed licensing have provided further opportunities for innovation. (Though the safety restrictions are somewhat hard to understand.)
Fine-tuning models and the use of tools like Langchian have become essential steps in the deployment of personalized models and production environments.
Pre-training is just the beginning. To make the model perform optimally on specific tasks, fine-tuning becomes particularly important. This is achieved by further training the pre-trained model on data specific to the task at hand. For example, although Llama2 performs well in text generation, fine-tuning is indispensable to make it perform better in specific question-answering tasks—hence the chat version of Llama2. (Of course, there are also issues like catastrophic forgetting that affect performance.)
⚠️ Note: I am currently conducting research in my free time, referring to various online tutorials and videos (I’ve spent quite a bit of time and resources, but the results are honestly not that great 🫠). I try to avoid mistakes in my descriptions, but there are still many gaps in my understanding or expression of knowledge. If you find any, please point them out in the comments or via email. Thank you very much 🙏.
⚠️ Note: If you are accessing this article using the Arc browser on a laptop, it’s recommended to temporarily hide the sidebar, otherwise the small screen width can be quite uncomfortable.
🤖 Background Information
According to the definition in this article, Large Language Models (LLMs) are a type of artificial intelligence that can mimic human intelligence. They use statistical models to analyze vast amounts of data, learning the patterns and connections between words and phrases. This allows them to generate new content similar to the style of specific authors or genres, such as academic papers or articles.
Firstly, language models are used to predict the probability of the next word appearing in a text sequence. These models can learn patterns in text data and can be trained to adapt to specific styles. For example, they can mimic the linguistic style of Shakespeare or modern pop culture and continue text based on that.
(Fully connected neural networks are a basic but powerful neural network structure, commonly used for classification, regression, and other problems. However, they are not the most effective for dealing with sequence data, especially long sequences.)
This brings us to the Transformer architecture, which is specifically designed for handling sequence data, particularly text data. Compared to fully connected neural networks, Transformers have distinct advantages in handling long-range dependencies and parallel computing.
Simple Explanation
Imagine you're hosting a party where everyone (words or other data points) wants to interact with each other to gather more information. But there's a rule at this party: you can't talk to multiple people at once, only one-on-one conversations are allowed. That's pretty inefficient, right? This is the problem with traditional RNNs (Recurrent Neural Networks) and LSTMs (Long Short-Term Memory networks).
Now, the Transformer walks into the party and says, "No need to line up, feel free to talk to anyone you want!" This way, information can flow rapidly between everyone, allowing each to get a comprehensive understanding of the whole scene. This is the so-called "attention mechanism," enabling each data point to consider all other data points rapidly.
But the Transformer goes beyond this. It introduces "multi-head" attention. Imagine that everyone can not only communicate with each other in their "normal language" but also simultaneously in "slang," "scientific jargon," and other "languages." In this way, each person can understand the same thing from multiple angles, gathering more enriched information.
In short, the Transformer is like a super party planner, enabling everyone to communicate quickly, efficiently, and comprehensively, thus making the entire party (or data processing task) more successful!
🫠 Basic Concepts of Fine-Tuning
As mentioned earlier, the main purpose of fine-tuning is to make the model more proficient at certain tasks, such as text classification, sentiment analysis, or question-answering. Fine-tuning aims to optimize the model’s performance on these specific tasks.

Source: Original content from microsoft
Below are some simple basic concepts about fine-tuning:
| Basic Concepts | Simple Explanation |
|---|---|
| Pre-trained Model | A model that has already “learned” and knows a lot of foundational things |
| Target Task | The specific “job” or “task” you want the model to perform |
| Transfer Learning | Applying the knowledge learned from one task to another task |
| Dataset | A set of “exercise questions” for a specific task, used to make the model better at that task |
| Learning Rate | Tells the model how quickly to “learn” the new task |
| Optimizer | A “coach” that helps the model learn better |
| Computational Resources | The computer and time needed for “learning” |
| Evaluation Metrics | Ways to assess how well the model performs on the new task, like exam scores |
| Regularization | Avoids the model from “cramming,” making it more flexible in applying what it has learned |
Three types of fine-tuning methods will be introduced in this article (the simpler, the better) (RLHF is currently not included in the article).
FFT (Full-Fine-Tuning)
FFT, or Full-Fine-Tuning, is a widely applied model fine-tuning method. In this approach, not only the last few layers of the model are fine-tuned (which is usually done in strategies where only the classifier layer is fine-tuned), but all layers of the model are fine-tuned. This means that the model’s entire architecture, from the input layer to the output layer, undergoes weight updates.
Key Features
-
Comprehensiveness: All layers of the model are fine-tuned, which usually leads to better model performance.
-
Flexibility: Since all parts of the model are learning, this method is generally better at adapting to the characteristics of new tasks.
-
Computational Load: Full-fine-tuning generally requires more
computational resources and time, as the entire model needs to be updated.
Applicable Scenarios
- When the target task differs significantly from the pre-training task, full-fine-tuning is usually more effective.
- When you have relatively
abundant labeled dataandcomputational resources.
SFT (Supervised-Fine-Tune)
SFT, or Supervised Fine-Tune, is a model fine-tuning method applied in a supervised learning environment. Unlike FFT (Full-Fine-Tuning), SFT usually only fine-tunes a few layers of the model rather than the entire model. This allows for greater focus on task-specific features and typically requires fewer computational resources.
Key Features
-
Goal-Oriented: The fine-tuning process is focused on closely aligning the model with a specific task.
-
Computational Efficiency: Since only some model layers are fine-tuned, SFT is generally more
computationally efficientthan FFT. -
Data Dependence: Being supervised, it requires relatively high-quality labeled data for fine-tuning.
Applicable Scenarios
- When the target task closely aligns with the pre-trained model, fine-tuning fewer layers is usually sufficient.
- When you have limited computational resources or want to achieve results more quickly.
(Q)lora (Low-Rank Adaptation)
LoRA (Layer-wise Recurrent Mechanism for Adaptation) is a new method for fine-tuning large pre-trained models, like Transformers. This method improves fine-tuning performance by adding a small number of adaptable parameters to each layer of the pre-trained model. These extra parameters introduce a layer-wise recurrent mechanism, allowing the model to adapt more effectively to new tasks during the fine-tuning process.
Key Features
-
Parameter Efficiency: LoRA
only adds a small number of parameters, significantly reducing computational complexity and storage requirements. -
Strong Adaptability: By adding a recurrent mechanism to each layer, LoRA allows the model to better adapt to new tasks.
-
Good Compatibility: LoRA can usually be seamlessly integrated with existing pre-trained models,
without requiring retraining.
Applicable Scenarios
- When you need to fine-tune with
limited computational and storage resources. - When you want to improve the performance of fine-tuning tasks without
impactingthe original structure of the pre-trained model.
Parameter-efficient fine-tuning (PEFT) methods allow us to adjust already-trained large language models (PLMs) for specific tasks using fewer computational and storage resources. Normally, adjusting these large models can be time-consuming and costly, but PEFT makes the process more convenient and economical by only adjusting a small subset of parameters. LoRA is one such method within PEFT.
QLoRA (Quantized Low-Rank Adapters) includes the “Q” for Quantization. Quantization is a technique that reduces the model size and memory footprint by converting floating-point numbers into low-bit integers. For example, 4-bit quantization maps floating-point numbers to integers within the range of 0 to 15. In simpler terms, it means that even consumer-grade GPUs can handle it, although the results I have achieved so far are not particularly good.
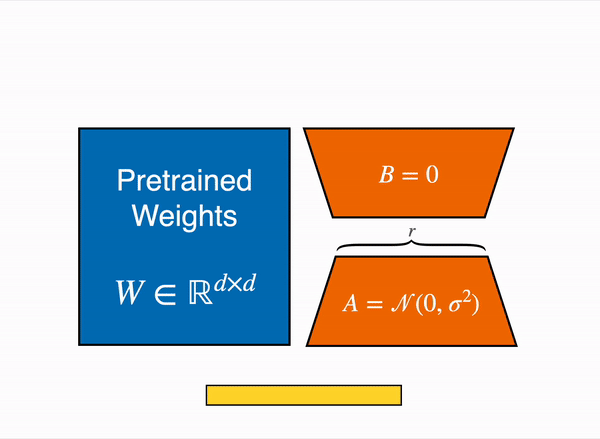
Output activation enhancements come from low-rank adapters (right) consisting of weight matrices A and B, compared to the original (frozen) pre-trained weights (left).
Source: Original content from huggingface
For more information, please refer to https://huggingface.co/blog/4bit-transformers-bitsandbytes
💬 Detailed Explanation of Fine-Tuning Methods
In this section, we will provide a detailed explanation of using Full-Fine-Tuning, SFT (Supervised-Fine-Tune), and QLoRA (Quantized Low-Rank Adapters) to fine-tune the Vicuna 7b 1.5 version model based on Meta’s Llama2. Except for Full-Fine-Tuning, which is difficult to fine-tune in Google Colab (Pro), other methods can be fine-tuned in Colab. Of course, for SFT methods, cloud service providers are recommended as they tend to be more cost-effective. Most of the content is referenced from online tutorials and official documentation. The original articles will be displayed in the Reference section. Thanks again.
1. Full-Fine-Tuning
Here we use the official fine-tuning method.
- Clone the repository
1 | git clone https://github.com/lm-sys/FastChat.git |
- Install necessary packages
1 | pip3 install --upgrade pip # enable PEP 660 support |
⚠️ Note: You’ll need to install Flash-Attention, which should be covered by pip3 install -e “.[train]”. Ninja will also be installed, speeding up the build process. Without Ninja, compilation may take a long time (2 hours) because it doesn’t use multiple CPU cores. With Ninja, compilation on a 64-core machine takes just 3-5 minutes, provided you have a 64-core machine.
FlashAttention-2 currently supports:
- Ampere, Ada, or Hopper GPUs (e.g., A100, RTX 3090, RTX 4090, H100).
- Data types fp16 and bf16 (bf16 requires Ampere, Ada, or Hopper GPUs).
- All head dimensions up to 256. When the head dimension is greater than 192, an A100/A800 or H100/H800 GPU is needed for backpropagation.
- Prepare dataset and start training
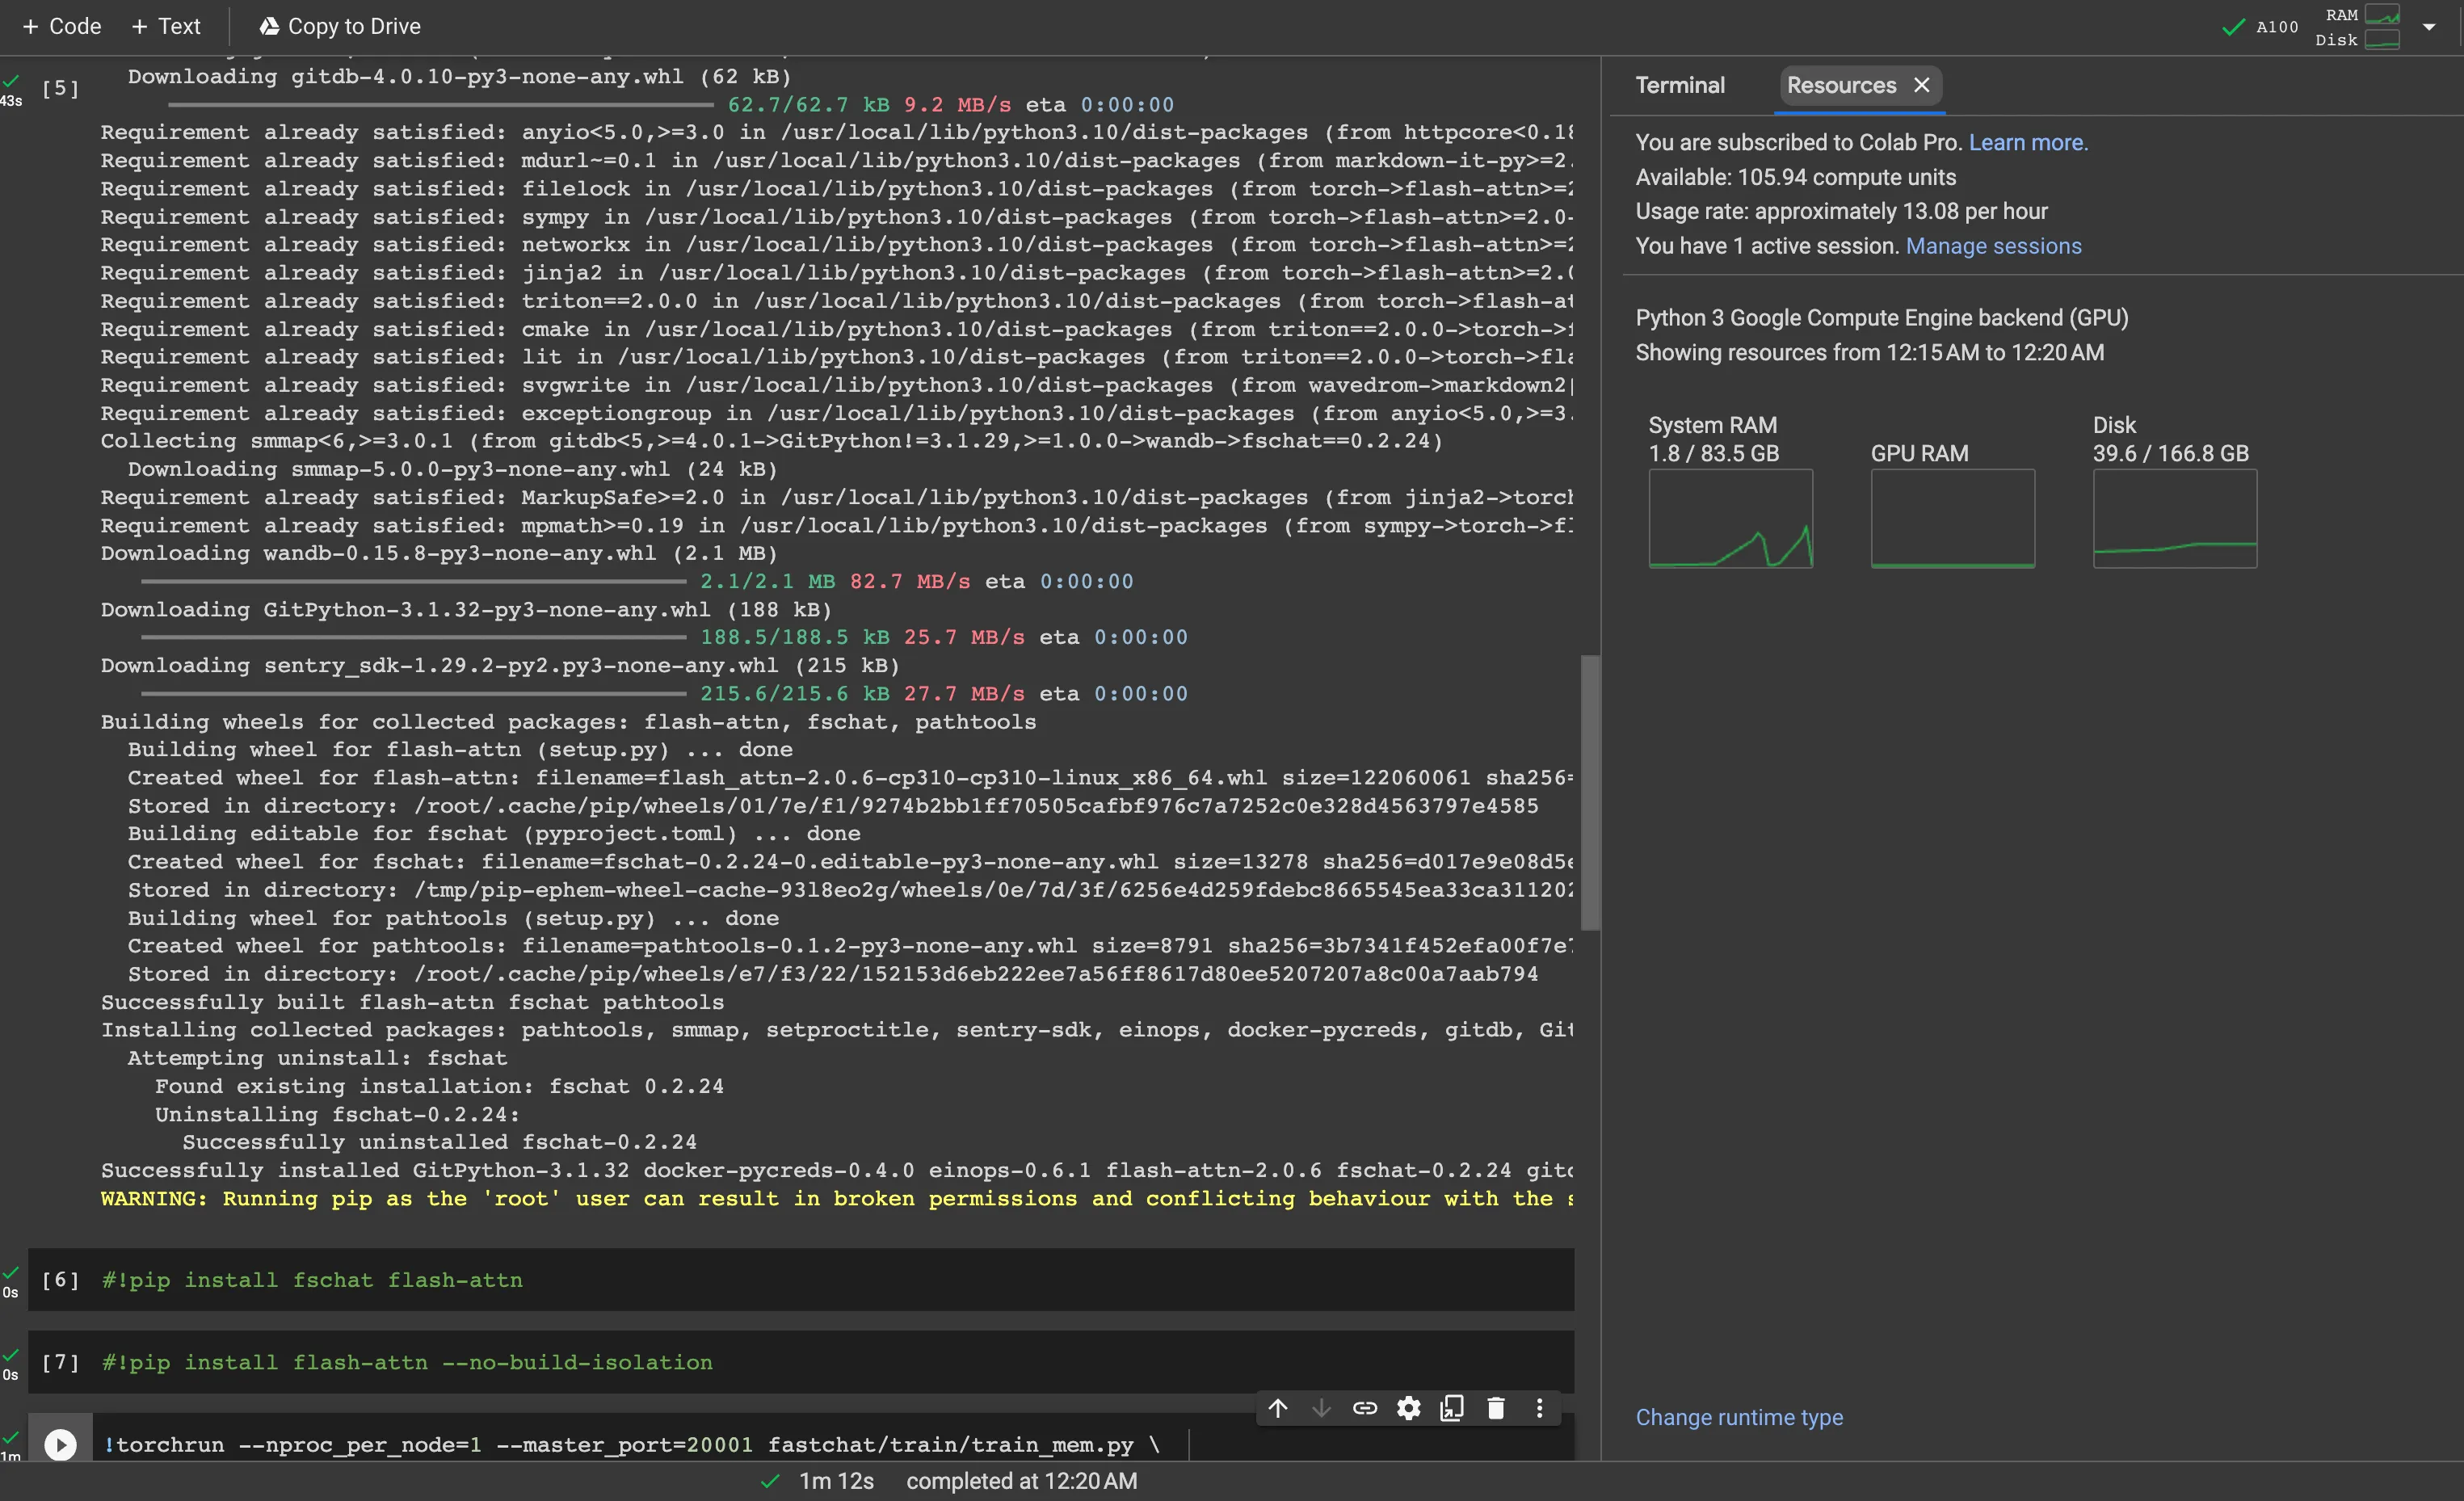
1 | torchrun --nproc_per_node=4 --master_port=20001 fastchat/train/train_mem.py \ |
The above method uses distributed training, so you may need multiple GPUs, such as 2, 4, or 8 A100s (40G or 80G RAM). The above is just an example; modify according to your specific situation.
Below are explanations of various parameters:
- (List of parameter explanations similar to the original text)
⚠️ Note: Before training, if you want to monitor the training status, you can use Wandb; you’ll need your token.
⚠️ Note: Your dataset should follow Vicuna’s format. Below is an official example format.
1 | [ |
Example Link: dummy_conversation.json
Here we use two A100 80G GPUs are used for testing.
Automatically refresh and display nvidia-smi (NVIDIA System Management Interface) output every 1 second.
1 | watch -n 1 nvidia-smi |

After training, you might want to upload the model to Hugging Face.
Use huggingface-cli login to log in and upload.
For details, refer to the official documentation: https://huggingface.co/docs/huggingface_hub/guides/upload.
2. Supervised-Fine-Tune
Here, we directly use the Hugging Face official autotrain advanced, which is more convenient.
GitHub repository: https://github.com/huggingface/autotrain-advanced
Below are the specific steps:
⚠️Note: The tutorial below uses Google Colab. If your system RAM is insufficient, you may need to use Google Colab Pro’s High RAM or a stronger GPU, like the A100. A common error is CUDA Out of Memory.
- First, check the GPU configuration.
1 | print("============Check GPU Info================") |
- Install Autotrain-advanced.
1 | !pip install autotrain-advanced transformers |
- Update Autotrain-advanced to ensure everything is up to date.
1 | !autotrain setup --update-torch |
- Check the help menu.
1 | !autotrain llm --help |
- Start training and upload to Huggingface.
1 | !autotrain llm --train \ |
Once everything is done, the model files will appear on Hugging Face. The new version has a merge option; you can directly merge.
Here is the official Colab.
3. Qlora & Lora
There are currently two relatively simple methods: one is the common method, and the other uses the official Deepspeed method.
The common method comes from mlabonne.github.io. Many thanks.
Common Method
First, install and import some necessary software.
1 | !pip install -q accelerate==0.21.0 peft==0.4.0 bitsandbytes==0.40.2 transformers==4.31.0 trl==0.4.7 |
1 | import os |
- Set up config
⚠️Warning: If you are using an A100 or H100 GPU, you can enable bf16 = True for acceleration, and you can also slightly increase the Batch size to speed up training.
1 | # The model that you want to train from the Hugging Face hub |
- Start Training
1 | # Load dataset (you can process it here) |

Display with TensorBoard
1 | %load_ext tensorboard |

Test using the correct format
1 | # Ignore warnings |
- Merge models and upload to Huggingface
1 | # Reload model in FP16 and merge it with LoRA weights |
1 | !huggingface-cli login |
This is the original author’s Colab file.:Colab
The original author’s other articles and courses are also very interesting 👍.
Deepspeed
Source: https://github.com/lm-sys/FastChat/blob/main/docs/training.md
You can use the following command to train Vicuna-7B with ZeRO2 using QLoRA. Please note that QLoRA is currently not supported by ZeRO3, but ZeRO3 does support LoRA, and there is a reference configuration for LoRA under playground/deepspeed_config_s3.json. To use QLoRA, you must install bitandbytes >=0.39.0 and transformers >=4.30.0.
1 | deepspeed fastchat/train/train_lora.py \ |
4. Convert to GGML format
Since the original model may still be quite large, or if you want to run the fine-tuned model more easily on a Mac/iPhone, converting the model to ggml format is an essential step. In this section, we will use llama.cpp to convert the model. You can perform the conversion on Google Colab and upload it to Huggingface.
- Clone Repo
1 | !git clone https://github.com/ggerganov/llama.cpp |
- Log in to Huggingface
1 | !pip install -q transformers==4.31.0 |
- Download Model
1 | !git clone https://huggingface.co/lmsys/vicuna-13b-v1.5-16k |
- Make and convert to ggml-model-f32.bin
1 | %cd / |
- Convert to Original llama.cpp quant methods:
q4_0, q4_1, q5_0, q5_1, q8_0
1 | !./quantize ./models/vicuna-13b-v1.5-16k/ggml-model-f32.bin ./models/vicuna-13b-v1.5-16k/ggml-model-q4_0.bin q4_0 |
1 | !./quantize ./models/vicuna-13b-v1.5-16k/ggml-model-f32.bin ./models/vicuna-13b-v1.5-16k/ggml-model-q4_1.bin q4_1 |
1 | !./quantize ./models/vicuna-13b-v1.5-16k/ggml-model-f32.bin ./models/vicuna-13b-v1.5-16k/ggml-model-q5_0.bin q5_0 |
1 | !./quantize ./models/vicuna-13b-v1.5-16k/ggml-model-f32.bin ./models/vicuna-13b-v1.5-16k/ggml-model-q5_1.bin q5_1 |
1 | !./quantize ./models/vicuna-13b-v1.5-16k/ggml-model-f32.bin ./models/vicuna-13b-v1.5-16k/ggml-model-q8_0.bin q8_0 |
- Upload to Huggingface
1 | from huggingface_hub import HfApi |
中文
🥳 介绍
欢迎!在本文中,我们将深入探讨几种流行的微调策略:FFT (Full-Fine-Tuning)、SFT (Supervised Fine Tune) 和 Qlora。每种策略都有其独特之处,适用于不同的场景和需求。让我们一起探索这些策略,理解它们的工作原理,以及如何在实际应用中选择和使用它们。让我们开始吧!
自从Llama1 出山后,开源模型社区开始百花齐放,从Alpaca, Vicuna, WizardLM 到百川,千问,ChatGLM,开源在很大程度上能够带给个人和企业更多的想法,带来多样性。随着Llama2的发布,更加优秀的性能(相对)(那个安全限制多少有点整不懂了)和许可证进一步宽松为进一步的创新提供了更多可能。
模型的微调和Langchian等工具的使用,成为了个性化模型和生产环境的部署的必备流程。
预训练只是初步的。要让模型在特定任务上达到最佳性能,微调就显得尤为重要。通过在特定任务的数据上进一步训练预训练模型,使其适应该任务。例如,虽然LLama2在生成文本方面表现出色,但为了使其在特定的问答任务上表现得更好,微调是必不可少的,也就是Llama2的chat版本。(当然也有灾难性遗忘等问题影响。)
⚠️ 注意:本人目前也在闲暇时间研究当中,参考了各种网上的教程和视频(花了不少时间和经费,成果其实并不怎么好🫠),尽可能避免在叙述中出现问题,但是依然有很多知识的的理解或表述存在漏洞,如有发现请在评论中或邮件中提出,非常感谢🙏
⚠️ 注意:如果在笔记本电脑上使用Arc浏览器访问该文章,建议暂时隐藏侧边栏,不然屏幕宽度太小属实有点难受
🤖 LLM的背景信息
根据这篇文章的定义,大型语言模型,或LLM,是一种可以模仿人类智能的人工智能。他们使用统计模型来分析大量数据,学习单词和短语之间的模式和联系。这允许他们生成与特定作者或流派风格相似的新内容,如论文或文章。
首先,语言模型是用来预测文本序列中下一个词出现概率的模型。这种模型能够学习文本数据中的模式,并且可以被训练来适应特定的风格。例如,它能够模仿莎士比亚或者现代流行文化的语言风格,并据此进行文本续写。
(全连接神经网络是一种基础但强大的神经网络结构,通常用于分类、回归等问题。然而,在处理序列数据,特别是长序列数据时,全连接神经网络并不是最有效的。)
这就引出了Transformer结构,它是一种专为处理序列数据,尤其是文本数据设计的架构。相比于全连接神经网络,Transformer在处理长距离依赖和并行计算方面有明显优势。
Simple Explanation
想象一下,你正在举办一场派对,每个人(单词或其他数据点)都想与其他人互动以了解更多信息。但这个派对有个规则:你不能一次与多人对话,只能一个接一个地谈。这样效率很低,对吧?这就是传统的 RNN(循环神经网络)和 LSTM(长短时记忆网络)的问题。
现在,Transformer 走进了派对,并说:“大家不用排队了,随便跟任何人交谈!”这样,信息就能快速地在所有人之间流动,每个人都能更全面地了解整个场景。这就是所谓的“注意力机制”,让每个数据点都能快速地考虑到其他所有数据点。
但 Transformer 不止于此,它引入了“多头”注意力。想象每个人不仅可以用他们的“普通话”与别人交流,还可以同时用“俚语”、“科学术语”等多种“语言”来交流。这样,每个人就能从多个角度来理解同一件事,获取更丰富的信息。
简而言之,Transformer 就像是一个超级派对规划者,让所有人都能迅速、高效且全面地交流,从而让整个派对(或者说,数据处理任务)更加成功!
🫠 微调的基本概念
就像之前提到的,微调的目的主要是让模型可以更加擅长做某些任务,例如文本分类、情感分析或问答等。微调就是为了优化模型在这个特定任务上的性能。
Source: Original content from microsoft
下面是一些关于微调的简单基础概念
| 基本概念 | 简单解释 |
|---|---|
| 预训练模型 | 一个已经“学过”的模型,知道很多基础的东西 |
| 目标任务 | 你希望模型能做的特定“作业”或“任务” |
| 迁移学习 | 让模型把在一个任务上学到的知识用在另一个任务上 |
| 数据集 | 一些特定任务的“练习题”,用于让模型更擅长这个任务 |
| 学习率 | 告诉模型应该多快地“学习”新任务 |
| 优化器 | 一个“教练”,帮助模型更好地进行学习 |
| 计算资源 | “学习”所需要的电脑和时间 |
| 评估指标 | 看模型在新任务上做得好不好的方法,就像考试的分数 |
| 正则化 | 避免模型“死记硬背”,使其能更灵活地应用所学到的知识 |
本文中将介绍的3种微调方式(怎么简单怎么来)(RLHF目前不包括在文章中)
FFT (Full-Fine-Tuning)
FFT,也就是全微调(Full-Fine-Tuning),是一种广泛应用的模型微调方法。在这种方法中,我们不仅微调模型的最后几层(这通常是在只微调分类器层的策略中完成的),而是微调模型的所有层。这意味着模型的整体架构,从输入层到输出层,都会进行权重的更新。
主要特点
-
全面性:所有模型层都被微调,这通常能带来更好的模型性能。
-
灵活性:由于模型的所有部分都在学习,这种方法通常更能适应新任务的特点。
-
计算量:全微调通常需要更多的
计算资源和时间,因为整个模型都需要更新。
适用场景
- 当目标任务与预训练任务有较大差异时,全微调通常更为有效。
- 当你拥有相对
充足的标注数据和计算资源时。
SFT (Supervised-Fine-Tune)
SFT,也就是有监督微调(Supervised Fine-Tune),是一种在有监督学习环境下进行模型微调的方法。与FFT(Full-Fine-Tuning)不同,SFT通常只会微调模型的某几层而非整个模型。这样可以更专注于任务相关的特定特性,并且通常需要更少的计算资源。
主要特点
-
目标导向:微调过程专注于模型与特定任务的
紧密配合。 -
计算高效:由于只微调部分模型层,SFT通常比FFT更
节省计算资源。 -
数据依赖性:由于是有监督的,需要相对高质量的标注数据进行微调。
适用场景
- 当目标任务与预训练模型非常接近时,微调较少的层通常就足够了。
- 当你有限的计算资源或希望更快地得到结果时。
(Q)lora (Low-Rank Adaptation)
LoRA(Layer-wise Recurrent Mechanism for Adaptation)是一种针对大型预训练模型(如Transformers)微调的新方法。该方法通过在预训练模型的每一层添加少量的可适应参数来提高微调性能。这些额外的参数为各个层添加了一种递归机制,使得模型在微调过程中可以更有效地适应新任务。
主要特点
-
参数高效:LoRA
只添加少量的参数,大大减少了计算复杂度和存储需求。 -
适应性强:通过在每一层都添加递归机制,LoRA使模型能更好地适应新任务。
-
兼容性好:LoRA通常可以和现有的预训练模型无缝集成,
不需要重新训练模型。
适用场景
- 当你需要在
有限的计算和存储资源下进行微调。 - 当你希望改善微调任务的性能,而
不影响预训练模型的原始结构。
参数高效微调(PEFT)方法允许我们用更少的计算和存储资源来调整已经训练好的大型语言模型(PLM),使其适用于特定任务。通常,调整这些大型模型会很费时间和金钱,但PEFT通过只调整一小部分参数,让整个过程更加便捷和经济。这个LORA就是PEFT的其中一种方法
QLoRA(Quantized Low-Rank Adapters)的Q代表量化(Quantization)。量化是一种减少模型大小和内存占用的技术,它将浮点数转换为低位数的整数。例如,4-bit 量化就是将浮点数映射到 0 到 15 的整数范围内。说白了就是单消费级GPU也可以搞定,但是我目前做出来的效果不是特别好
输出激活原始(冻结)预训练权重(左)由权重矩阵 A 和 B 组成的低秩适配器(右)增强。
Source: Original content from huggingface
更多信息请参考 https://huggingface.co/blog/4bit-transformers-bitsandbytes
💬 微调方法详解
在本节中我们将详细讲解使用Full-Fine-Tuning,SFT (Supervised-Fine-Tune) 和 QLoRA(Quantized Low-Rank Adapters)来微调 基于Meta的Llama2的微调模型Vicuna 7b 1.5版, 其中除Full-Fine-Tuning很难在**Google Colab (Pro)**中进行微调外,其他方法是可以Colab中微调的,当然SFT的方法还是推荐云服务提供商的价格会便宜一点,大部分内容参考了网上教程和官方文档,原始文章将在Reference中显示,再次感谢
1. Full-Fine-Tuning
这里使用官方的微调方法
- 克隆仓库
1 | git clone https://github.com/lm-sys/FastChat.git |
- 安装一些必要的包
1 | pip3 install --upgrade pip # enable PEP 660 support |
⚠️注意:这里需要安装Flash-Attention,根据pip3 install -e “.[train]”是没有问题的,ninja也会安装的,Build的速度可以提上去,没有 Ninja,编译可能会花费很长时间(2小时),因为它不使用多个CPU核心。使用 Ninja,在64核机器上编译只需要3-5分钟。前提是你要有64核机器
FlashAttention-2 目前支持:
Ampere、Ada 或 Hopper 显卡(例如,A100, RTX 3090, RTX 4090, H100)。对 Turing 显卡(T4, RTX 2080)的支持即将到来,请暂时使用 FlashAttention 1.x 版本以支持 Turing 显卡。
数据类型 fp16 和 bf16(bf16 需要 Ampere、Ada 或 Hopper 显卡)。
所有头维度(head dimensions)直至 256。当头维度(head dim)大于 192 时,需要 A100/A800 或 H100/H800 显卡以进行反向传播(backward)。
- 准备好数据集开始训练
1 | torchrun --nproc_per_node=4 --master_port=20001 fastchat/train/train_mem.py \ |
上面的方法使用分布式训练,你可能需要准备多台GPU,例如2台或4台或8台A100 (40G或80G RAM)同时上面的只是一个例子,需要根据实际情况修改
以下是各个参数的解释:
-
torchrun --nproc_per_node=4 --master_port=20001: 这是torchrun命令的一部分,用于分布式训练。nproc_per_node设置每个节点上的进程数,而master_port设置主节点的端口。 -
fastchat/train/train_mem.py: 这是你要运行的Python脚本。 -
--model_name_or_path lmsys/vicuna-7b-v1.5-16k: 预训练模型的名称或路径。 -
--data_path [your dataset path]: 训练数据集的路径。 -
--bf16 True: 是否使用bf16(Brain Floating Point 16)进行训练。 -
--output_dir output_vicuna: 模型和日志输出的目录。 -
--num_train_epochs 1: 训练轮数。 -
--per_device_train_batch_size 1: 每个设备上的训练批量大小。 -
--per_device_eval_batch_size 1: 每个设备上的评估批量大小。 -
--gradient_accumulation_steps 4: 梯度累积的步骤数。 -
--evaluation_strategy "no": 评估策略,这里设置为“不进行评估”。 -
--save_strategy "steps": 保存策略,这里设置为按步数保存。 -
--save_steps 1200: 每多少步保存一次模型。 -
--save_total_limit 10: 最多保存的模型数量。 -
--learning_rate 2e-5: 学习率。 -
--weight_decay 0.: 权重衰减。 -
--warmup_ratio 0.03: 学习率预热的比例。 -
--lr_scheduler_type "cosine": 学习率调度类型。 -
--logging_steps 1: 每多少步进行一次日志记录。 -
--fsdp "full_shard auto_wrap": 使用全分片数据并自动包装模型用于FSDP(分布式数据并行性)。 -
--fsdp_transformer_layer_cls_to_wrap 'LlamaDecoderLayer': 要用于FSDP包装的Transformer层的类。 -
--tf32 True: 是否使用TF32数据类型。 -
--model_max_length 2048: 模型的最大长度。 -
--gradient_checkpointing True: 是否使用梯度检查点来节省内存。 -
--lazy_preprocess True: 是否使用延迟预处理。
⚠️注意: 训练之前如果你需要查看训练的状况,可以使用Wandb,你需要用你的token
⚠️注意: 你使用的数据集应该遵循Vicuna的格式:下面是一个官方的例子格式
1 | [ |
这里使用两台A100 80G做测试
每1秒钟自动刷新并显示nvidia-smi(NVIDIA System Management Interface)的输出
1 | watch -n 1 nvidia-smi |
训练完成后你也许想要把模型上传到huggingface上
使用 huggingface-cli login 登录并上传
具体请参考官方的文档: https://huggingface.co/docs/huggingface_hub/guides/upload
2. Supervised-Fine-Tune
在这里,我们直接使用hugging face官方的autotrain advanced 比较方便
Github仓库如下: https://github.com/huggingface/autotrain-advanced
下面是具体步骤:
⚠️注意:下面教程使用Google Colab,如果系统RAM不够你可能需要使用Google Colab Pro的High RAM或使用更强的GPU,例如A100,通常的报错是CUDA Out of Memory
- 首先看看GPU配置如何
1 | print("============查看GPU信息================") |
- 安装 Autotrain-advanced
1 | !pip install autotrain-advanced transformers |
- 更新一下Autotrain-advanced确保一切都是最新的
1 | !autotrain setup --update-torch |
- 查看下帮助
1 | !autotrain llm --help |
- 开始训练并上传Huggingface
1 | !autotrain llm --train \ |
当一切完成后,模型文件出现在hugging face,新版有merge选项,可以直接merge
这是官方的 Colab
3. Qlora & Lora
目前看到有两种比较简单的方法
一种是普通方法,一种使用官方的Deepspeed方法
普通方法来自 mlabonne.github.io 非常感谢
普通方法
首先安装并导入一些必要的软件
1 | !pip install -q accelerate==0.21.0 peft==0.4.0 bitsandbytes==0.40.2 transformers==4.31.0 trl==0.4.7 |
1 | import os |
- 设置config
⚠️注意:如果你使用A100或H100 GPU, 你可以开启bf16 = True加速,同时可以稍微增加Batch size加快训练速度
1 | # The model that you want to train from the Hugging Face hub |
- 开始训练
1 | # Load dataset (you can process it here) |
用tensorboard显示
1 | %load_ext tensorboard |
用正确的格式测试下
1 | # Ignore warnings |
- 合并模型并上传Huggingface
1 | # Reload model in FP16 and merge it with LoRA weights |
1 | !huggingface-cli login |
这是原作者的Colab文件:Colab
原作者的其他文章和课程也非常有意思 👍
Deepspeed
Source: https://github.com/lm-sys/FastChat/blob/main/docs/training.md
您可以使用以下命令使用ZeRO2使用QLoRA训练Vicuna-7B。请注意,QLoRA目前不支持ZeRO3,但ZeRO3确实支持LoRA,LoRA在playground/deepspeed_config_s3.json下有一个参考配置。要使用QLoRA,您必须安装比特和字节>=0.39.0和变压器>=4.30.0。
1 | deepspeed fastchat/train/train_lora.py \ |
4. 转换成ggml格式
由于原始模型可能依然比较大,或者你想在Mac/iPhone上比较轻松的运行微调过的模型,将模型转换成ggml格式是必不可少的一步。这一节中我们将使用llama.cpp转换模型。你可以在Google Colab上转换并上传至Huggingface
- 克隆Repo
1 | !git clone https://github.com/ggerganov/llama.cpp |
- 登录huggingface
1 | !pip install -q transformers==4.31.0 |
- 下载模型
1 | !git clone https://huggingface.co/lmsys/vicuna-13b-v1.5-16k |
- Make 并转换成ggml-model-f32.bin
1 | %cd / |
- 转换成 Original llama.cpp quant methods:
q4_0, q4_1, q5_0, q5_1, q8_0
1 | !./quantize ./models/vicuna-13b-v1.5-16k/ggml-model-f32.bin ./models/vicuna-13b-v1.5-16k/ggml-model-q4_0.bin q4_0 |
1 | !./quantize ./models/vicuna-13b-v1.5-16k/ggml-model-f32.bin ./models/vicuna-13b-v1.5-16k/ggml-model-q4_1.bin q4_1 |
1 | !./quantize ./models/vicuna-13b-v1.5-16k/ggml-model-f32.bin ./models/vicuna-13b-v1.5-16k/ggml-model-q5_0.bin q5_0 |
1 | !./quantize ./models/vicuna-13b-v1.5-16k/ggml-model-f32.bin ./models/vicuna-13b-v1.5-16k/ggml-model-q5_1.bin q5_1 |
1 | !./quantize ./models/vicuna-13b-v1.5-16k/ggml-model-f32.bin ./models/vicuna-13b-v1.5-16k/ggml-model-q8_0.bin q8_0 |
- 上传huggingface
1 | from huggingface_hub import HfApi |
✈️ 总结
在本文中,我们详细探讨了大型语言模型的微调技术,包括FFT(Full-Fine-Tuning)、SFT(Supervised Fine Tune)和Qlora。这些微调方法各有优缺点,适用于不同的场景和需求。
展望未来,随着预训练模型和微调技术的不断进步,我们有理由相信,微调将会变得更加高效、灵活和可靠。
最后,本文旨在为那些对微调大型语言模型感兴趣的读者提供一个全面的指南。通过对比分析和实例应用,我们希望本文能为您在未来的研究或项目中选择适当的微调方法提供有价值的参考。
如果您在文章中注意到了一些问题或有建议的,请您在评论中提出,我们将非常感谢您!
Reference
Meta-Llama 2 Hugging-Face
Perplexity.ai’s online LLAMA-2-7B-CHAT
Open Foundation and Fine-Tuned Chat Models’s Paper
mlabonne.github.io
The EASIEST way to finetune LLAMA-v2 on local machine!