The Simplest Linux NVIDIA GPU Fan Speed Control Tutorial
Introduction
If your Linux server/PC is equipped with an NVIDIA GPU and you need to adjust its fan speed via SSH without a graphical interface, this is the easiest method to achieve your goal. Whether you’re looking to reduce noise, enhance efficiency, or simply keep your hardware cool, this guide will help you get started quickly.
(No GUI Required,just need SSH)(Perhaps the simplest)
Script Address: https://github.com/RoversX/nvidia_fan_control_linux/
Quick Start Guide
Setting Up Your Environment
-
Create a Python Virtual Environment
1
2
python3 -m venv fan
source fan/bin/activate -
Install the pynvml Library
1
pip3 install pynvml
-
Download the Fan Control Script
1
wget https://raw.githubusercontent.com/RoversX/nvidia_fan_control_linux/main/nvidia_fan_control.py
For user in China mainland, find more information from https://www.autodl.com/docs/network_turbo/
-
Modify the script as needed
1
2
3
4
5
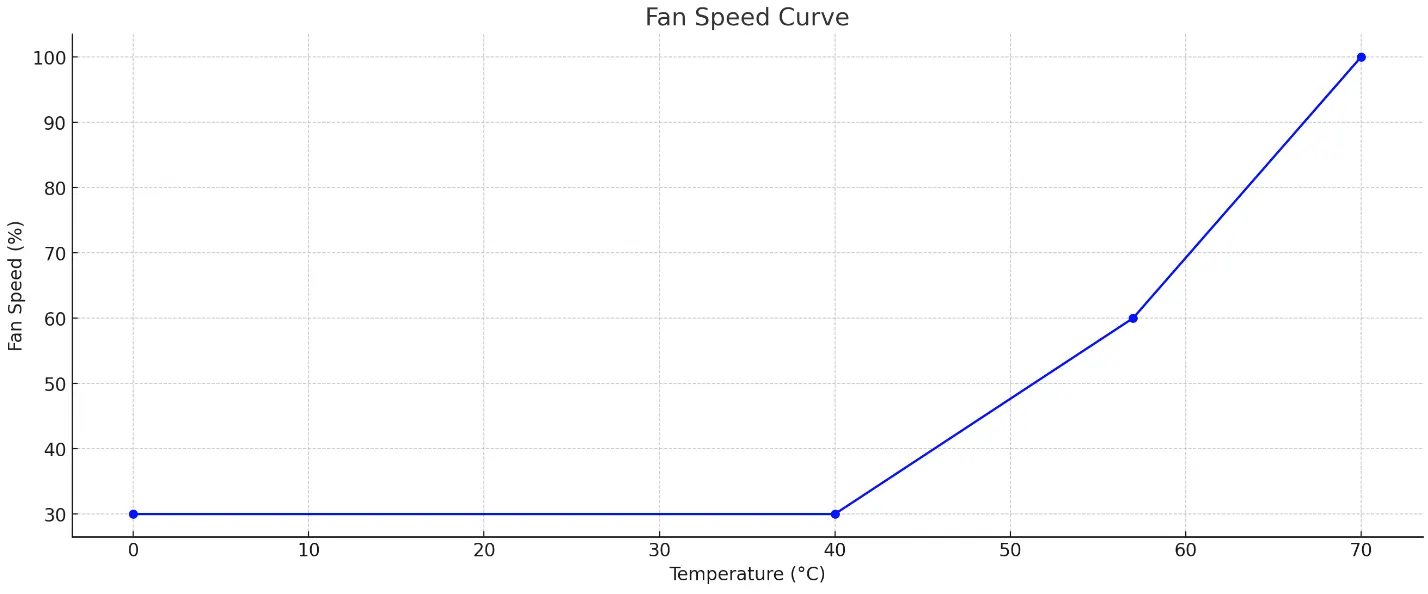
6# Fan curve parameters
temperature_points = [0, 40, 57, 70]
fan_speed_points = [27, 40, 80, 100]
# Sleep interval to reduce CPU activity
sleep_seconds = 5
Configure the Script
Create a simple fan.sh script to make the start-up process more convenient
1 | nano fan.sh |
In the editor that opens, copy and paste the following content:
1 |
|
Start the Fan Control
With everything set up, all you need to do is run the following command to start controlling the fan speed:
1 | ./fan.sh |
Output Example
After running the script, you will see an output like this:
1 | x@x:~$ ./fan.sh |
This output clearly shows the current temperature and fan speed of your GPU, ensuring your device operates under optimal conditions.
This script was improved based on: https://github.com/Cippo95/nvidia-fan-control
I also use some code from https://gist.github.com/AlexKordic/65f031b708177a01a002cc19f0d7298c to reset back to auto fan control.
1 | finally: |
Conclusion
With these steps, you can easily control the fan speed of NVIDIA GPUs on Linux without the need for a graphical interface, making it particularly suitable for remote management and server environments.
简介
如果您的 Linux 服务器或电脑配备了 NVIDIA GPU,并且需要通过 SSH 调整其风扇速度,而不需要图形界面,那么这是达到目标的最简单方法。无论您是想减少噪音、提高效率,还是简单地保持硬件冷却,本指南将帮助您快速入门。
(不需要 GUI,只需要 SSH)(也许是最简单的方法)
脚本地址: https://github.com/RoversX/nvidia_fan_control_linux/
快速入门指南
设置环境
-
创建一个 Python 虚拟环境
1
2python3 -m venv fan
source fan/bin/activate -
安装 pynvml 库
1
pip3 install pynvml
-
下载风扇控制脚本
1
wget https://raw.githubusercontent.com/RoversX/nvidia_fan_control_linux/main/nvidia_fan_control.py
对于中国大陆用户,请访问 https://www.autodl.com/docs/network_turbo 获取更多信息。
-
根据需要修改脚本
1
2
3
4
5
6# 风扇曲线参数
temperature_points = [0, 40, 57, 70]
fan_speed_points = [27, 40, 80, 100]
# 休眠间隔以减少 CPU 活动
sleep_seconds = 5
配置脚本
创建一个简单的 fan.sh 脚本,使启动过程更加方便。
1 | nano fan.sh |
在打开的编辑器中,复制并粘贴以下内容:
1 |
|
启动风扇控制
设置完成后,只需运行以下命令即可开始控制风扇速度:
1 | ./fan.sh |
输出示例
运行脚本后,您将看到如下输出:
1 | x@x:~$ ./fan.sh |
此输出清楚地显示了 GPU 的当前温度和风扇速度,确保您的设备在最佳条件下运行。
此脚本基于 https://github.com/Cippo95/nvidia-fan-control 改进。我还使用了 https://gist.github.com/AlexKordic/65f031b708177a01a002cc19f0d7298c 中的一些代码以重置回自动风扇控制。
1 | finally: |
结论
通过这些步骤,您可以轻松地在没有图形界面的情况下控制 Linux 上的 NVIDIA GPU 风扇速度,非常适合远程管理和服务器环境。