Host a Minecraft Server on Linux
Introduction
This time, we will teach you how to create a basic Minecraft Server on Linux, so you can play locally with your friends.
Hosting a Minecraft server unlocks a tonne of additional control over how you play Minecraft with your friends. You can change the game rules and difficulty, the behaviour of enemies and determine how players interact.
Reference
Note
We’ll be using Ubuntu Desktop 22.04 for in this tutorial.
STEP 1
Download and Install your System
You can get system from Debian and Ubuntu (Common Systems)

STEP 2
Make sure all software are the latest
whenever we start a new project, it’s always important to make sure everything is up to date.
open a Terminal and type:
1 | sudo apt update |

STEP 3
Install JAVA
Minecraft servers are based on Minecraft Java Edition, the original version of Minecraft, so our next step is to install Java on our Computer.
1 | sudo apt install openjdk-18-jre |
1 | sudo apt install openjdk-21-jre-headless |
NOTE: Update to openjdk 21 for 1.20.5 server
Type Y to continue
STEP 4
Download Minecraft Server
There are two ways to download.
In your browser, go to this page: https://www.minecraft.net/en-us/download/server
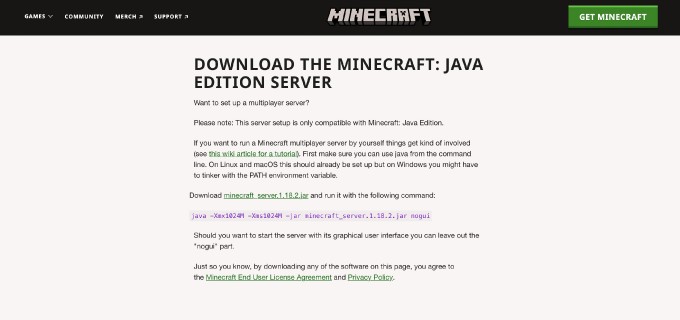
Download the server file or use wget to download in Terminal
1 | wget |
Download minecraft_server.1.18.2.jar
(Make sure you download the latest, this is just a example)
STEP 5
Create a folder for your server
Use GUI or use terminal
1 | mkdir Minecraft-Server |
Go to the folder
1 | cd Minecraft-Server |
Bring the file you downloaded to the folder
1 | mv server.jar Minecraft-Server |
STEP 6
Start the server
Type this will lead error. >_<
1 | java -Xmx1024M -Xms1024M -jar minecraft_server.1.18.2.jar nogui |
This command on the official website won’t work, Because the file on your folder is called server.jar
This is the right one —>
1 | java -Xmx1024M -Xms1024M -jar server.jar nogui |
Emmmm…
STEP 7
One More Step
We need to agree to the EULA (End User License Agreement )before we can get started.

1 | sudo gedit eula.txt |
Now you just need to change the eula line to true instead of false.
STEP 8
Start the server again
1 | java -Xmx1024M -Xms1024M -jar server.jar nogui |


Source: Ubuntu’s Post
STEP 9
Some Commands
You can stop your server any time by typing
1 | stop |
STEP 10
Modifying your Server Settings
Server.properties is a file that stores all the settings of the multiplayer game (Minecraft or Minecraft Classic) server.
When editing server.properties, even if the order between different rows can be disrupted, it is important to ensure that it has the same structure as the original file.
1 | sudo gedit server.properties |
1 | #Minecraft server properties |
Default as of 22w11a.
Find more from minecraft.fandom.
STEP 11
Connecting to your Minecraft server remotely
NAT Service
For Another Time. >_<
Conclusion
Here We Are, Thank You Very Much.